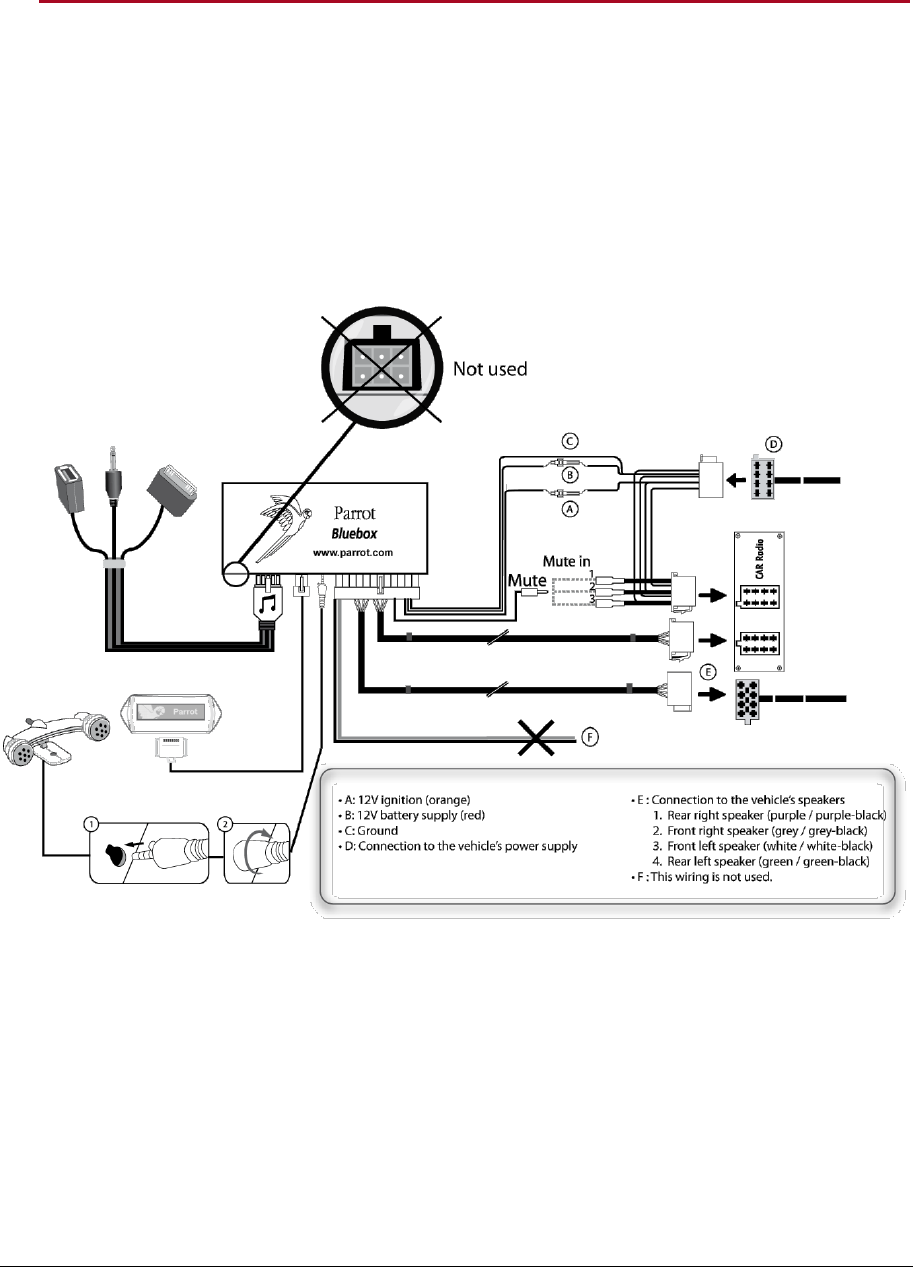
Parrot MKi9100 7User guide Installing the kits power cable Note. Car stereo with line-in.
Parrot Mki9100 Wiring Diagram - If you're looking for video and picture information linked to the keyword you have come to visit the right site. Our site gives you hints for viewing the maximum quality video and picture content, hunt and locate more informative video articles and graphics that match your interests. includes one of tens of thousands of video collections from several sources, particularly Youtube, therefore we recommend this movie for you to view. It is also possible to bring about supporting this site by sharing videos and images that you enjoy on this site on your social networking accounts such as Facebook and Instagram or educate your closest friends share your experiences concerning the simplicity of access to downloads and the information you get on this site. This site is for them to visit this website.

Diagram Wiring Diagram Parrot Ck3100 Full Version Hd Quality Parrot Ck3100 Tvdiagram Fanofellini It
Parrot MKi9200 User guide 7 Installing the kits power cable Note.
Parrot mki9100 wiring diagram. Refer to the Checking the wiring section for more information. More information can be found on the Sup-. If you have the possibility to use a multimeter test and verify all connections on the vehicle before connecting the Parrot MKi9200 wiring loom.
Refer to your car stereos wiring diagram. On the installation cable connect the free yellow wire to one of the audio systems. Once the Parrot MKi9100 is installed.
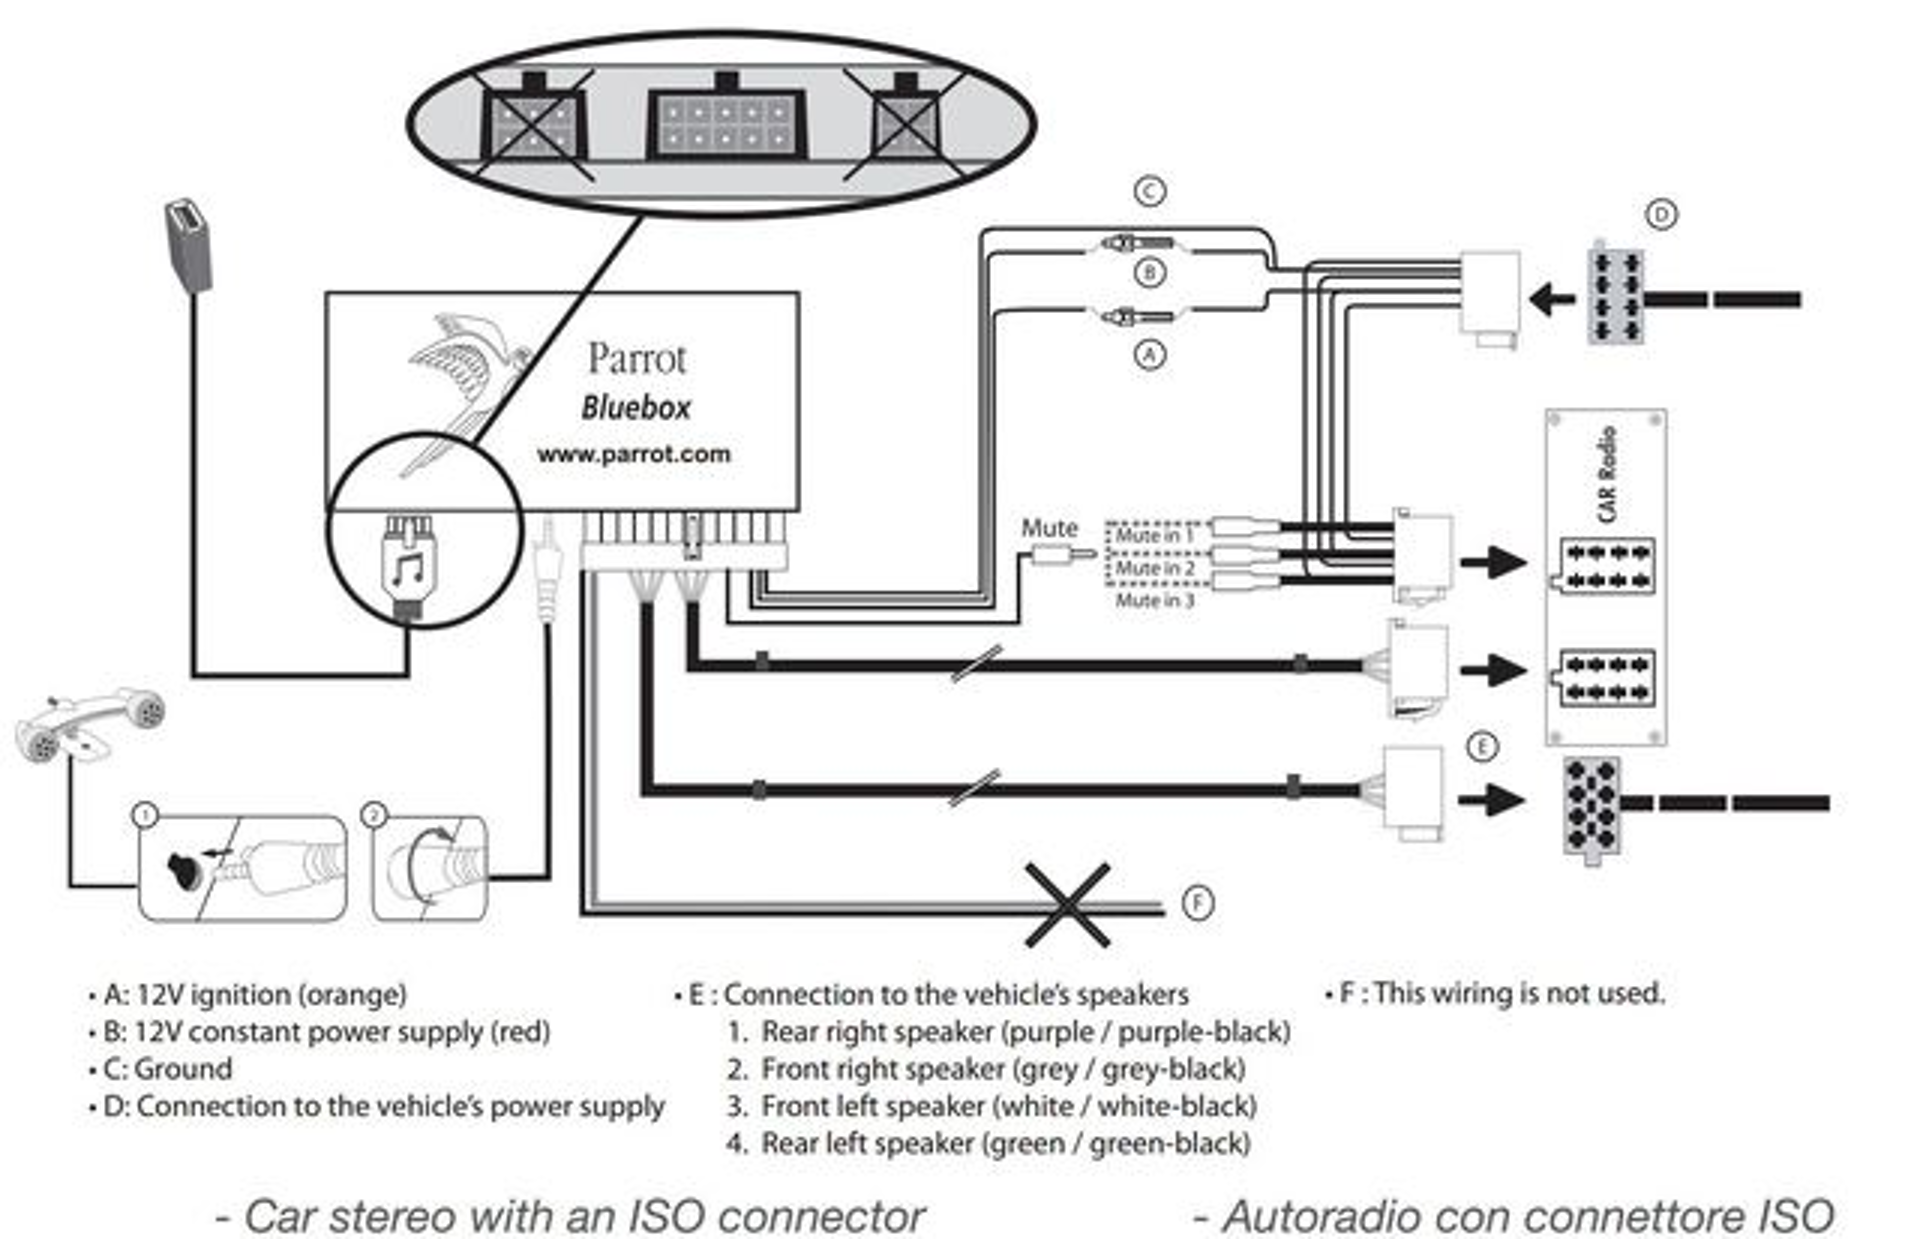
This can be done simply by reversing both fuse holders located on the Parrot wiring. Wire to the 12V ignition and the black wire to the ground. Here is a picture gallery about parrot mki9200 wiring diagram complete with the description of the image please find the image you need.
Wire to the 12V ignition and the black wire to the ground. How to install parrot mki9200 hands mki9000 bluetooth car kit free user manual mki9100 bc 6495 socket wiring diagram together ck3000 hand s the radio cable ck3200plus my diy 3100 español How To Install Parrot Mki9200 Hands Free Kit Official How To Install Parrot Mki9000 Hands Free Kit Official Parrot Ck3102 Bluetooth Car. The message Good bye must be displayed.
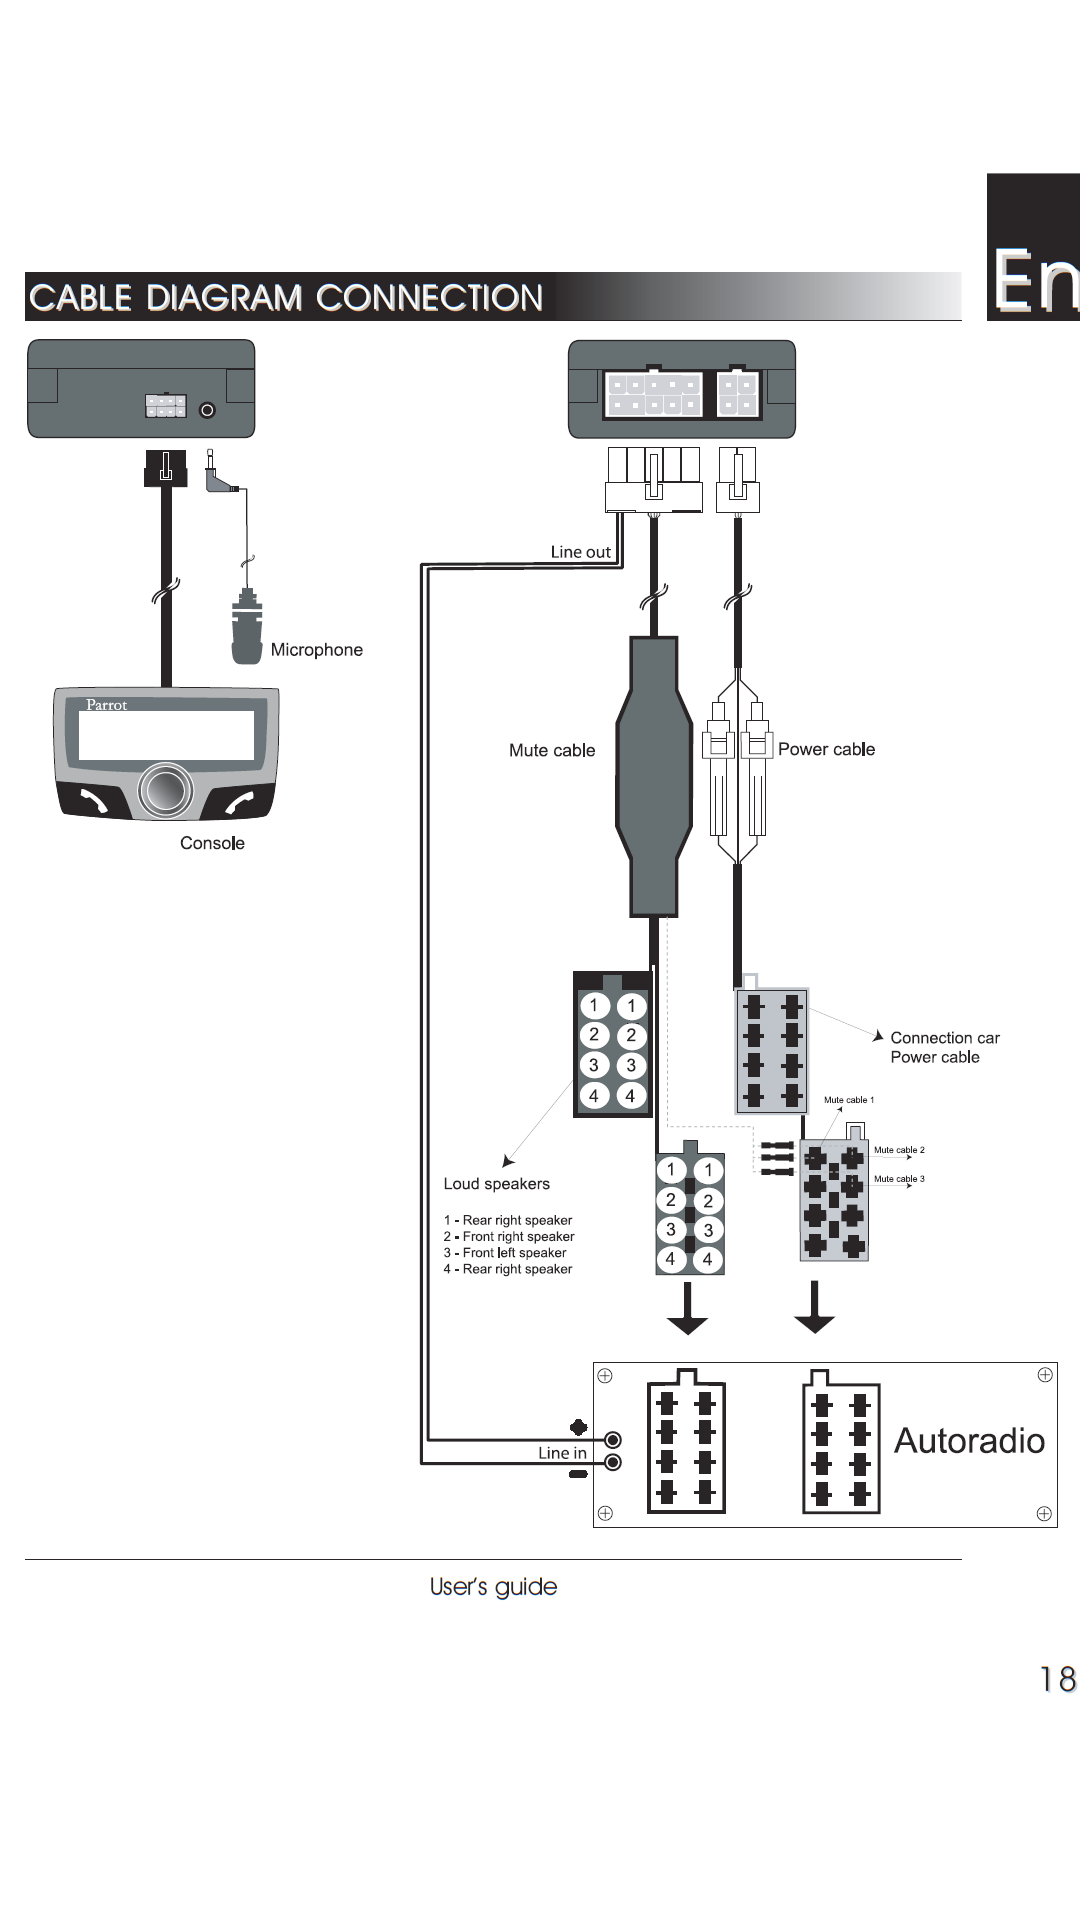
Drill a 20 mm hole in your dashboard glove compart-. This simpli ed guide to the Parrot MKi9100 is there fore limited to providing you with the main instructions that will make it easy for you to use the device. Installing the audio connectors The music cable grommet system allows you to adjust the cable length while reducing its wear.
Connect the audio and power cable bundles from the vehicle to the female connectors of Parrot MKi9100. Connect the male connectors of the hands-free kit to the car stereo. This can be done simply by reversing both fuse holders located on the Parrot wiring.
Available mute in 1 mute in 2 or mute in 3. If it is not the case it is necessary to inverse the positions of the red and orange wires. Connect the male connectors of the hands-free kit to the car stereo.
Enter 0 0 0 0 on your phone. Before connecting the Parrot MKi9100 wiring loom. Before connecting the Parrot MKi9100 wiring loom.
Parrot MKi9100 User Manual. On the installation cable connect the spare yellow wire to one of the corresponding Mute in inputs on the audio system if present mute in1 mute in2 or mute in3. Installing the audio connectors The music cable grommet system allows you to adjust the cable length while reducing its wear.
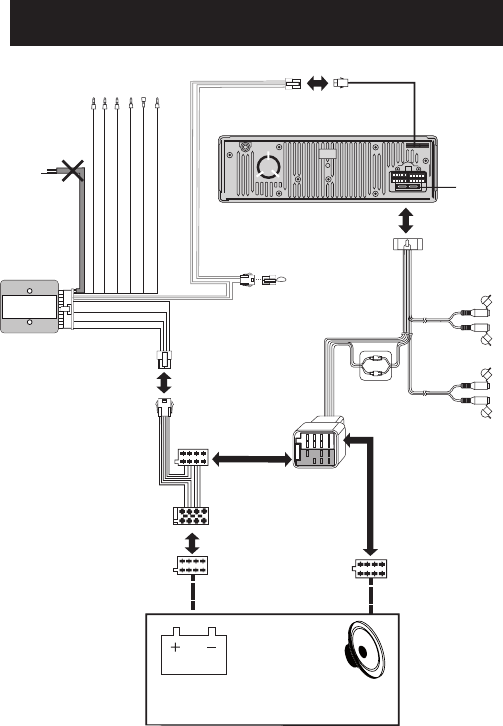
On the installation cable connect the free yellow wire to. Refer to your car stereo s wiring diagram. Join the vehicles audio and power supply cables to the female connectors of the Parrot MKi9100.
In order to check the wiring connect the screen before placing it on the dashboard. Select Parrot MKi9100 in the list. The red wire of the kits cable must correspond to the constant 12V supply the orange wire to the.
Car stereo with ISO connectors 1. Parrot MKi9000 4User guide Installing the kit Note. Parrot MKi9100 User guide 11 Using the Parrot MKi9100 for the 1st time Navigating through the menus Hold down the button for 2 seconds to turn on the Parrot MKi9100.
This can be done. Indeed the red wire of the power cable must be connected to the permanent 12V the orange wire to the 12V ignition and the black wire to the ground. You are prompted to enter a PIN code.
Refer to the installation diagram p7. Wire to the 12V ignition and the black wire to the ground. MKi9100 hold down the and If the remote control doesnt seem to be associated.
Wire to the 12V ignition and the black wire to the ground. The red wire of the kits cable must correspond to the constant 12V supply the orange wire to. This can be done simply by reversing both fuse holders located on the Parrot wiring.
Installing the audio connectors The music cable grommet system allows you to adjust the cable length while reducing its wear. Connect the male connectors of the hands-free kit to the car stereo. Join the vehicles audio and power supply cables to the female connectors of the Parrot MKi9100.
Drill a 20 mm hole in your dashboard glove compart-. On the installation cable connect the free yellow wire to the corresponding audio systems mute-input if available mute in 1 mute in 2 or mute in 3. Parrot Mki9100 Wiring Diagram Parrot Mki9100 Delete Paired Devices for Parrot Mki9200 Wiring Diagram image size 600 X 475 px and to view image details please click the image.
S The red wire of the kit s cable must correspond to the con-stant 12V supply the orange wire to. One of the audio system s corresponding mute-in jacks if. On the installation cable connect the free yellow wire to one of the audio systems.
Car stereo with ISO connectors 1. I have a question about the MOST bus incompatibility. Refer to your car stereo s wiring diagram.
Refer to your car stereo s wiring diagram. Female connectors of the Parrot MKi9100. Car stereo with ISO connectors 1.
This can be done simply by reversing both fuse holders located on the Parrot wiring. When I look at the wiring diagrams of MKi9200 using the ISO connection options I see that the MKi9200 appears to take the output from the factory MOST Bus stereo that wouldve gone into the speakers into its main body and then spits out a set of speaker output itself. Pairing successful is displayed on the screen of the Parrot MKi9100.
Refer to the Checking the wiring section for more information. In order to check the wiring connect the screen before placing it on the dashboard. Using the PARROT MKi9100 for the 1st time The Parrot MKi9100 is.
Connect the male connectors from the hands-free kit to the car radio. Installing the audio connectors Connect the music cable to the electronic box and place the USB iPod Jack connectors into the glove box the central console or the parcel tray depending on the. Drill a 20 mm hole in your dashboard glove compart-.

Parrot Unika For Mercedes Cars Pdf Free Download
Creojam Fabrizio How To Install Parrot Mki9100 Bluetooth Handsfree Car Kit

How To Install Parrot Mki9200 Hands Free Kit Parrot Store Official

How To Install Parrot Mki9100 Parrot Official

Wiring Diagram Parrot Ck3100 1995 Ford Econoline Conversion Van Fuse Panel Diagram Lupdiagram Willd Proraceteam It

Parrot Unika For Mercedes Cars Pdf Free Download
Parrot Car Stereo System Mki9100 Users Manual
Manual Parrot Mki9100 Page 10 Of 52 English German Dutch French Italian Spanish
Wiring Diagram Parrot Ck3100 1995 Ford Econoline Conversion Van Fuse Panel Diagram Lupdiagram Willd Proraceteam It
